1.Safety Statement
It is not the intent of this Standard to address all of the safety issues associated with its use. It is the responsibility of the user of this Standard to train personnel, establish proper health and safety procedures, and be aware of local, state, and national regulatory restrictions that may apply.
Some tests use materials that local, state, and national regulatory agencies have determined to be hazardous. These tests shall be performed under controlled conditions where the safety and protection of personnel shall be of prime consideration. Information and instructions contained in the material Safety Data Sheets (SDS) for handling and working with such products shall be followed. Discharge of these chemicals to the environment must be controlled in accordance with all applicable regulations.
Certain test procedures require high voltage. It is important that the equipment be designed to comply with relevant electrical codes. Safety must be an integral part of the design. In such cases, necessary precautions must be taken and test equipment manufacturers’ recommendations shall be followed.
Some tests utilizing mechanical equipment may expose the operator to mechanical hazards. Care must
be exercised to protect eyes, fingers, hands, and other body parts from injury.
In tests requiring elevated temperatures, precautions must be taken in handling materials exposed to heat to avoid skin burns.
2.Selection of Specimens
The requirements are applicable only to the size ranges indicated or as shown in awg 4 – awg 48.
If there is evidence that the wire on the surface of the package has been damaged, the damaged wire shall be discarded before specimens are taken for testing. Wire specimens shall be removed from the package in a way that prevents damage such as bending, stretching, kinking, etc.
As dielectric breakdown, dissipation factor, and high voltage continuity test results are affected by the presence of skin oils, acids, salts, dust, dirt, etc., care shall be exercised when handling test specimens.
3.Ambient Conditions of Test
Unless otherwise specified, all tests shall be made at room temperature, which shall be between 15ºC (59°F) and 40°C (104°F).
4.Power Frequency
Tests shall be conducted using 60 Hz power unless otherwise specified.
5.Mandrels
Mandrel diameters are expressed in multiples of “d” (the nominal round bare wire diameter or thickness or width of rectangular and square bare wires). The mandrel diameter shall be expressed in decimal dimensions to the nearest mil (0.001 in.) (0.025 mm).
For diameters smaller than 30 AWG (0.0100 in.) (0.254 mm), the mandrel diameter shall not vary from the specified diameter by more than one mil (0.025 mm). For diameters equal to or larger than
30 AWG, the mandrel diameter shall not vary from the specified diameter by more than 1% as measured to the nearest mil (0.025 mm).
6.Rectangular and Square Wire
References to rectangular wire in the test procedures in NEMA MW1000 Part 3 include square wire unless otherwise indicated.
The dimension tables for rectangular and square copper and aluminum wire are based on a series of standardized AWG size subdivisions for thickness and width.
7.Round Wire
7.1.AWG Size
The nominal American Wire Gauge (AWG) bare wire diameter in inches is calculated using the basic
mathematical characteristics of the AWG rounded to the nearest 0.0001 in.:
Where:
X = nominal bare wire diameter in inches to be determined
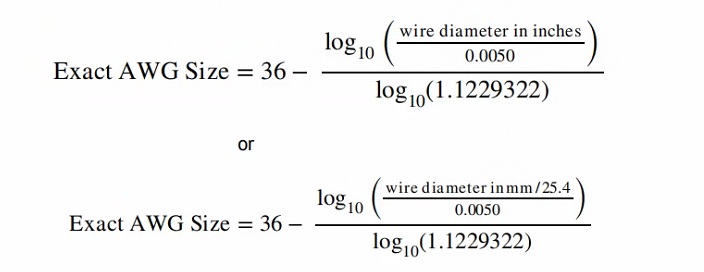
0.0050 = nominal base diameter in inches for 36 AWG
1.1229322 = 39√92 = the ratio of the diameter of any AWG size to the (smaller) diameter
of the next larger AWG size
36 = the AWG number of the base diameter
N = the equivalent AWG number of X, where N is normally a whole number
For sizes 4/0 to 2/0 AWG, N is a negative number from -3 to -1
In the case where the nominal bare wire diameter is known, the AWG size is calculated as follows:

NOTE—The minimum and maximum bare diameters in inches are calculated as follows:
2-13.5 AWG film-insulated round wire (see Table 1): Minimum Bare Diameter = Nominal Bare – 1%
Maximum Bare Diameter = Maximum Film Insulated OD – (Minimum Film Increase + 0.0003 in.)
These special maximum bare dimensions have been established to avoid bare wire diameter values that, when combined with the Minimum Film Increase, would lead to ODs greater than the Maximum Film Insulated OD or eliminate any manufacturing tolerances. Both the Minimum Film Increases and the Maximum Film Insulated ODs were previously established Standard values that must be maintained. The maximum bare diameter in the above formula shall be allowed to be exceeded up to the nominal bare diameter +1% provided the maximum overall diameter of the film insulated product is not exceeded.
Otherwise:
1/0-44 AWG Nominal Bare ±1%, according to ASTM B3
Maximum bare OD may exceed nominal by up to 1% if the maximum film insulated OD is
maintained.
7.2.Ultra-Fine Dimensions
Theoretical nominal bare copper wire sizes (45-56 AWG). The conductor dimensional tolerances are measured by electrical resistance according to ASTM B193.
NOTE—The International Electrotechnical Commission has adopted the preferred number series for round and rectangular wire. Mathematically, the preferred numbers form a geometrical series (with a constant ratio between adjacent numbers) based on the 20th or 40th root of 10. These series are known as the R-20 and R-40 series. Preferred number series values in inches (rounded to the nearest 0.001 in.) represent a conversion from original computations in mm.

